Most demos that land in my inbox share the same problem: drums way out front, bass wrestling the kick, melody perched on top of the snare. Solo any element and it’s fine. Together they sound like a pile of parts, not a record.
The fix costs you one device and roughly two minutes: drop an SSL-style bus compressor across your mix bus. The technique goes by glue compression, and after you’ve heard it work once, it ends up on nearly every project you touch.
One honest caveat first. No bus compressor rescues a bad balance. A kick sitting 6 dB too hot needs a fader move, not a plugin. But get the levels roughly sane, and glue is the step that converts “a bunch of tracks” into “a track”.
What an SSL bus compressor actually is
The original lived in the center section of the SSL 4000-series consoles of the 80s. Engineers kept noticing that passing the full mix through it made everything tighter and more record-like, which is how it ended up printed on an enormous chunk of the music you grew up hearing.
The reason it glues: it’s a slowish, program-dependent VCA design. Individual hits don’t get grabbed. Instead it leans gently on the mix’s overall energy, so a loud moment pulls the whole picture down together for an instant. That shared motion is what your ear interprets as “these sounds live in the same room”.
No hardware required, and no official plugin either. Any compressor in the SSL bus style will do the job:
- Waves SSL G-Master Buss Compressor
- UAD SSL G Bus Compressor
- Cytomic The Glue (and Ableton’s stock Glue Compressor, which is built on it)
- Logic’s stock Compressor in Bus mode
- TDR Kotelnikov: free, not an SSL clone, but works fine for this job
Every setting below carries over to all of them.
The settings: exact numbers to start from
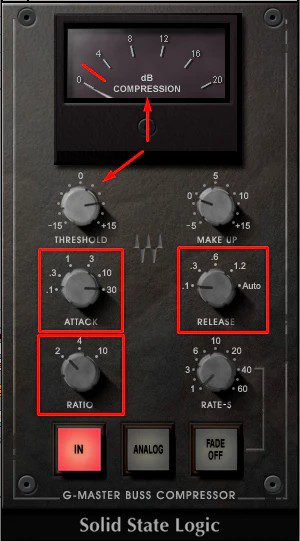
- Attack: 30 ms. Deliberately slow. Kick and snare transients sneak through before the clamp comes down. Go faster and your drums come back softer and duller.
- Release: fastest setting, or Auto. That’s 0.1 s on the classic SSL. The point is for the compressor to recover before the next hit arrives, so the mix breathes along with the groove rather than sitting squashed. Auto release earns its keep here by tracking the material on its own.
- Ratio: 2:1. Keep it gentle. This is gluing, not smashing.
- Threshold: pull it down until you see 2–3 dB of gain reduction during the loudest parts of the song. You want the needle dancing with the beat and landing back at zero in the gaps.
- Makeup gain: add back roughly what you took off (2–3 dB) so bypassed and active sit at identical loudness.
Don’t skip that last step. The ear always votes for louder, so an unmatched before/after comparison is a rigged test. Level-match first, then hit bypass. If the compressed version wins, it should win by sounding fuller and more together, not merely bigger.
One modern addition: a sidechain high-pass filter, if your plugin has one, set somewhere around 60–90 Hz. It keeps the kick and 808 from dragging the entire mix down on every hit. The original hardware never had this; nearly every current plugin does, and it’s the single best upgrade to the vintage recipe. If the low end is your actual battle, I covered locking kick and 808 together in Serum 2 808 bass.
Try the same trick on the drum bus
When the mix bus version makes sense to your ears, group every drum onto one bus and glue that as well. Drums tolerate much more squeeze, so adjust the recipe: 4:1 ratio, attack anywhere from 10–30 ms depending on how much snap you’re protecting, fast release, and aim for 3–4 dB of reduction. Suddenly the kit moves like one instrument instead of a folder of samples.
Layered one-shots love this treatment in particular. Most of my drum buses get built from packs like Drums Utopia Vol.1 or the Ultimate Drill & Trap Drum kit, and gluing the bus is what convinces samples from different sources they were tracked in the same session.
That loop sits together out of the box because it was processed as a unit. When you glue your own drum bus, that’s the finish line you’re listening for.
Common mistakes with glue compression
Too much gain reduction. Beyond 3–4 dB on the mix bus, glue becomes pumping. Extra loudness is the limiter’s job, at the very end of the chain — not this compressor’s.
Using it to fix balance. Bus compression smooths out moments across time; it does nothing about levels between instruments. A loud snare comes out the other side still loud. Faders first, always.
Adding it last. If a bus compressor is definitely in the track’s future, insert it early and mix into it. Every balance decision then reacts the way the finished record will. Bolting it on after the fact quietly rewrites choices you’d already settled.
Fixing at the mix what should be fixed in the sound. Plenty of “nothing glues” complaints are really sound-selection complaints: thin presets living in one narrow slice of the spectrum. Serum 2’s built-in FX buses let you compress and shape layers inside the synth itself, so sounds show up at the mix already sitting where they should. I go through that in the Serum 2 effects guide. For raw material that arrives pre-balanced, the free Serum 2 presets pack has 271 sounds we tuned to sit in a mix without heroics.
FAQ: SSL glue compression
How much gain reduction should I use on the mix bus?
2–3 dB at the loudest moments, needle back to zero between phrases. That’s where the classic SSL curve lives. Push past it and the pumping becomes audible; stay under 1 dB and the compressor is basically decorative.
Should I mix into the bus compressor from the start?
If you know one is coming, yes. Put it in early with the settings above and balance through it. Your hands compensate for its behavior automatically as you go, and the end of the mix holds no surprises.
What’s the difference between glue compression and limiting?
Glue is mild (2:1, a couple of dB) and shapes how the mix moves: a mixing tool. Limiting is heavy gain reduction chasing loudness at the very end: a mastering tool. Most tracks use both, but they’re separate jobs, and the limiter always goes last.
Do I need a real SSL plugin, or is my stock compressor fine?
Stock works. Ableton’s Glue Compressor is literally an SSL-style circuit, Logic’s Compressor offers a Bus mode, and in FL Studio any VCA-style compressor at 2:1 with a 30 ms attack lands very close. The recipe beats the badge.
And that’s the entire trick: 30 ms attack, fast release, 2:1, 2–3 dB of reduction, level-match, A/B honestly. Need material to practice on? The free Serum 2 presets pack is sitting there — no strings, just 271 presets to build a mix worth gluing.

I run Monosounds.studio and make the packs myself. Ten-plus years of producing, 97+ releases, 16,000+ downloads. Every Serum 2 preset we ship passes a CPU check on a mid-range laptop and gets used in a real track before release. If it does not survive a mix, it does not go in the pack.
More about Maxim & the studio →

